Pages

Showing posts with label food. Show all posts

Tuesday, September 13, 2011

Fowl. Trussed and Roasted.

Yesterday we ate the most perfect roasted chicken.  Perfection I tell you.  I cannot get over how delicious it was.  And how simple.  So awesome that I'm going to detail how easy it is to create.


We get our birds from our CSA.  (that's Community Supported Agriculture to those of you who aren't in the know)  They raise their chickens out on the farm, where they forage, roam, sun themselves, and eat whatever falls in front of them.  They're organic and as free range as one can get.  We even visit them each week at pick-up.  Talk about knowing your food source!  Well, we are gearing up for our final bird pick-up of the season by eating the last of the ones in the freezer, and last night I wanted the most simple way to roast a chicken, as I was feeling a bit under the weather.  I've roasted chickens about one million and one ways under the sun.  In white wine, with butter sauce, stuffed with 40 cloves of garlic, over root vegetables, lemon butter and thyme, basted with beer...I could go on and on.  Each variation is good in its own right.  However this one takes the cake on taste, simplicity, and idiot-proofness.  First you must learn how to properly truss your bird.  This is something I've never taken the time to learn.  (smacks forehead)  I looked up videos and now I know.  Thank the interwebs for You Tube.  Here's the video I used:


See?  Easy-peasy.  Now, on the the actual roasting of the bird.  I couldn't tell you exactly what mine weighed.  Probably 6-7 pounds.  It was one of our larger birds though.  I found the recipe on Epicurious (which, by the way, is my favorite iPad/iPhone app for cooking!).  It is titled, My Favorite Simple Roast Chicken.  Here are the basics for you:

Preheat your oven to 450 degrees.
Line roasting pan with heavy duty foil.
Wash and thoroughly dry your bird.  Dry. Dry. Then dry some more. You want no moisture so you have no steam. I used lots of paper towels.
Liberally salt and pepper the cavity with freshly ground pepper and kosher salt.
Truss your bird. (I did this backwards and it worked just fine)
Rain salt over your bird.  The recipe recommends about one tablespoon of kosher salt.  I did not measure, I salted until it sparkled.  It freaked me out, but in the end was perfection.
Place into roasting pan you have lined with heavy duty foil.
Put bird into oven once it is up to temperature and roast 50-60 minutes (until it is done cooking...use your meat thermometer!)
Remove from oven, placing bird on cutting board.  Baste with pan juices.  I also basted with butter I melted with some sage and thyme.  Allow bird to rest 15 minutes.  Then carve and enjoy.

This will be the most tender and delicious chicken you've ever eaten.  We devoured it.  I don't know that I'll ever make one another way.  The skin was crispy and golden.  The meat was tasty and moist.  And the best part was it was very little work!  I only am sorry I didn't get any photographs for you.  I was too busy cleaning up the mess I made when I burned a batch of roasted butternut squash and ruined my favorite sheet pan.  Stupid juicy squash and maple syrup. 

At least we had chicken!


Blog Footer

Tuesday, July 5, 2011

Adventures in Picky Eating

I used to be what one would call a "picky eater." When my husband met me no matter where we went to eat, it was chicken fingers and fries for me, thank you very much. My knowledge of vegetables ran only as far as the tuber family could take me. Anything green, forget it. Over the years though, my palate has expanded broadly. I merrily order steak cooked medium rare (emphasis on the rare). I bake kale chips whenever it is in season and gobble them down. I could eat butternut squash roasted all fall and winter long. I will kill a platter of crab cakes before you can blink. And, (this totally blows my husband's mind) I've even been known to spread roasted marrow on crusty bread and sprinkle it with sea salt before downing it. Chasing it with a swig with a dry, spicy, punch-you-in-the-mouth red wine. Yes, I said marrow. As in bone. As in, we ordered a giant porterhouse steak for the two of us, and I had heard the marrow was good. It was. Mmmmmmmmmmm. Needless to say, I am not that picky anymore.

However, there is a picky eater in our house. Our son. I shouldn't be too shocked. After all, I come from a family of four kids, and three of us strained the "bits" out of sauce before it hit the plate (the fourth kid just ate the "bits" from the other three on top of his!). But our son used to eat anything you put in front of him-with glee. With gusto. With abandon. He loved any and all food. We still talk about the time he was with us at a fancy Italian restaurant and had part of our braised lamb shank and cannelini beans. Then he hit a wall. I can count the foods he will stuff in his face on my 10 fingers. We worry about nutrition. We fret over anemia (he really just wants PBJ). He even will go 1-2 days with hardly consuming anything other than liquid. Of course the next few he eats like someone hired him to, and he's getting paid in M&Ms and matchbox cars.

This summer our goal is to re-expose him to as many tastes as we can. The school year is so crazy, that meals can be hectic. We have gotten our stubbornly picky eater to consume the following:
Hamburger
Grilled red/orange/yellow peppers and zucchini
Baked potatoes
Hot Dogs (that was a first! Always claimed to hate them before!)
Steak
Strawberries
Peaches
Raspberries
Blueberries
Cantaloupe
Ribs
Baked Beans

Most everything he gagged down at first, and other than the baked potato, he pretty much likes it all. This look comes over his face, kind of shock, and he says "it's good!" Like we were trying to trick him or something. We have all sorts of tactics-we "race" him to get bites in, we threaten to drink his precious juice box, we have been known to get treats after dinner and he doesn't if he didn't eat properly (but the next few days shoves pretty much everything into his mouth). Maybe by the time school starts he won't be so picky, and will actually eat the school lunch? One can hope. I just know how crippling it can be to be a picky eater, and don't want my son to be held back in the same way I was in my youth. The world is your plate little man, eat up!

Blog Footer

Tuesday, June 28, 2011

On the grill

It is officially summertime. The sun is warm. The skies are blue. The kids are out of school. Round here the wheat is turning a lovely shade of gold as the corn & soy beans are straining to get taller by the second. I'm loving it. And because it is summer, we are using the grill an awful lot more than any other time of the year. (does anyone grill in the dead of winter? And speaking of that, who remembers the Cosby episode where Cliff went out to Bae-be-que in a blizzard?! Loved that one!). Our garden isn't too plentiful yet-we're zone 4ish here-so for now I'm mostly grilling meat. But here are a few of our favorites right now:

Grilled Halibut on Cedar Planks
My favorite fish. Hands down. Nothing local about it, I know. But this fish makes me swoon. Our picky 4 year old even loves it. I grilled it on cedar planks that had been soaked in water for 24 hours. The fish steaks had marinated in lemon juice, salt, and pepper for 30 minutes. After grilling, they were served with a lemon white wine butter sauce. There are one million online. Basically, it's lemon juice (fresh) butter and wine cooked until reduced. I throw in the lemon peels for added flavor. Our son gobbled it up and declared it was "chicken fish!" Whatever it takes, right?

Steak
Now I'm picky when it comes to steak. It has to be tenderloin. Not because I like the cut or the flavor. I have wretched dental work that won't let me chew anything less tender. Boo. When my husband orders a NY strip steak and moans over its deliciousness I ooze envy. Anyhow...we have been giving the steaks minimal treatment...bring them to room temperature, brush with olive oil, sea salt, pepper and put on a high temperature for about 4-5 minutes per side. Voila! Medium rare filets and a happy family.

Chicken
Finally, the grilled entree of my childhood summers. We would eat chicken on the grill's rotisserie each weekend it seemed. That smell, taste, sight sends me straight back to my grandparents back yard in Firestone Park. Two weekends ago we got our first poultry share from our CSA. This round got a lemon butter, charcoal treatment. Nothing compares to chicken cooked over charcoal with a little hickory thrown in at the end. Mmmmmmmmm!

So, what are your favorite summertime grill treats? Clearly we keep them easy here-no recipes involved! Share ideas and inspiration. When veggies start to roll in soon we will br throwing those delights on the grill too, so more to come.

Blog Footer

Tuesday, June 14, 2011

Strawberry Season & Freezer Jam

So I've started on my Summer List already (this is the new & improved version of vacation everyone!).  Last week I was driving to a meeting and saw our spot for strawberries had their sign out.  Ohioans, strawberry season has arrived! I'll apologize now for the prolific use of exclamation points in today's post, as local strawberries seem to warrant it.  I mean, just look at these beauties.  How could they not?


Wolf's Berries & Blooms

So, we geared up this morning, drove down to Wolf's Blooms and Berries and grabbed ourselves several quarts of those juicy little gems.  


We got the loot!
Two thumbs up for strawberries! 

I love a good barn.
Can't help it...I love me some barns.


More barn love.
Oooohhhh...this one too!  

Enough with the barns...ready to get down to brass tacks?  It's time to make some jam.


Because it is so important to do this step-by-step, even though it is the "quick and easy" method (aka, freezer jam), I'll walk you through it and post the full recipe at the end.  It is very easy, but you still have to follow the directions.  Let me repeat...follow the directions.  By the letter. Mmmmm kay? Let's begin!


First, assemble all of your ingredients and supplies before you begin.  This will ensure you aren't running to look for, let's say, lemons while your jam is starting to set!  That would be bad (as my sweet boy says).


Get everything ready first.


Come to momma.
These will get rinsed in the sink...explanation to follow.


As you can see, I have placed everything on the counter.  You'll need pectin.  For this exact recipe I use Certo Liquid Pectin.  I follow my mother-in-law's instructions, and she was very specific about this brand.  It worked like a charm.  Also, cane sugar.  Extra fine.  Extra fine people.  You aren't cooking this and want the sugar to dissolve without heat.  Beet sugar (common around the Midwest) won't cut it for this part.  Pony up the pennies and get the best you can get your hands on.  Extra fine.  Lemons are needed for their juice.  Because I said so.  Then you have needed accouterments-measuring devices, cutting boards, etc.  And then....


You need a big bowl. Two big bowls.


You'll need a giant bowl.  Huge.  Two of em actually.  Because after you rinse the berries, they need to go somewhere.  Then you'll need to measure em, crush em, and put that into something else.  Two big uns.  Get yourself some.  Giant ones.  


Clean Jars.


Then you'll need something to put your jam into once you've finished it.  I just use the Ball jars I have for other preserving purposes.  They're pretty, freeze just fine, and are re-usable.  Whatever you choose, it must be freezer safe.  Wash it up first in extra-hot, soapy water.  Then line it all up like little soldiers and admire your work.  Okay, you can skip that part, but I like to do this before I start for fun.  And, have more on hand than you think you'll need.  Just in case the recipe made more, you'll want to preserve it too, right?  At least we don't throw away good jam in this house!

And all chopped.

Now, the strawberries that were all pretty earlier got dumped (gently) into my sink.  I don't mess with a strainer, colander, or other contraptions when I'm washing up this much fruit.  I just turn over the stopper, and rinse right in the sink.  Then I trimmed off the stems/leaves put them in the compost pile and quartered the berries.  Here is my finished work.  See why you need a large bowl?  

Crushed Berries.


Once you've gotten the berries cut up, time to measure and begin the quick and easy part.  The directions say you can crush the berries with a potato masher, but I prefer to use my hands.  It's the kid in me.  Measure your strawberries in a liquid measuring cup.  I just grab handfuls (clean hands!) and squeeze them into the measuring cup.  We like a chunky jam, but crush to your desired consistency.


Ready for jars.

Now, I only have so many hands, and this part goes fast.  But you add in your sugar, lemon juice and pectin mixture and stir away to dissolve everything together.  I forget how quickly it begins to work!  But look at that lovely jam already made.  You could almost taste it on the screen!! 


Momma, is it time to ride bikes yet?
Can I ride my bike yet momma?

I use a wide mouth funnel to fill the jars.  Once filled, wipe the rims with a damp cloth and they're ready to seal.  Since it is freezer jam, there is no need to process at all.  Just let it sit at room temperature for 24 hours until set.  Then refrigerate for up to 3 weeks or freeze for up to 12 months.  Voila!  Strawberry Freezer Jam!  The process, start to finish took about three hours, the longest part was cutting the fruit.  And honestly, I made a quadruple batch because we adore this stuff.  When I make blueberry freezer jam, peach freezer jam, and mixed berry freezer jam, the quantity won't be quite so high.  Maybe just double batches?  Someone stop me!  

Finally, the jam is done! Ridin his wheels.
Finally, she's done! Now I can ride my bike! 


Here's the recipe/directions for any interested readers.  Enjoy your local strawberry seasons while you can by supporting local berry farmers.  Make lots of jam, shortcakes, pies and more!  


Strawberry Freezer Jam

1. Wash and rinse containers with tight fitting lids.  Use 1-2 cup size containers.  (Some of mine were 4oz)
2. Prepare fruit as directed.  Crush berries one cup at a time.  Use a potato masher for best results (or clean hands).  If using food processor, pulse to fine chop DO NOT PUREE.
3. Measure exact amount of prepared fruit into large (giant) bowl.
4. Measure exact amount of sugar into separate bowl. (REDUCING SUGAR OF USING SUGAR SUBSTITUTES WILL RESULT IN SET FAILURES)
5. Stir sugar into prepared fruit. Mix well.  Let stand 10 minutes, stir occasionally.
7. Stir pectin mixture into prepared fruit.  Stir constantly until sugar is completely dissolved and no longer grainy. (about 3 minutes...a few crystals may remain)
8. Pour into prepared containers, leaving 1/2 inch headspace for expansion during freezing; cover.
9. Let stand at room temperature for 24 hours until set.  Refrigerate up to 3 weeks.  Otherwise store in freezer for up to 1 year.  Thaw in refrigerator.

Ingredients:
2pt strawberries
1 lemon

Discard stems and crush strawberries.

2 cups crushed strawberries
2 tbsp. fresh lemon juice
4 cups sugar
1 pouch Certo Pectin

Yield 4 cups jam

Happy preservation!


Blog Footer

Wednesday, May 4, 2011

Easter Paska

As promised, here is the recipe and story for my family's favorite bread-Easter Paska Bread.  This is a traditional Ukrainian Easter bread that I grew up eating each spring.  My grandma would bring a few freshly baked loaves home for consumption around Easter Sunday-from the Ukrainian Church bake sale.  I have vivid memories of devouring warm, soft slices of this sweet eggy bread studded with white raisins.  She was liberal with the butter and it would melt in little pools all over the top.  Comfort food at its finest.  This is a bread that goes perfectly with an Easter ham or just a cup of morning coffee.


After grandma passed away eight years ago, our family traditions were one of the ways remained connected to her.  While she wasn't ever a cook, and hadn't ever taught me how to bake those scrumptious loaves, I wanted to ensure they weren't missing from our Easter table.  Luckily, I found a Ukrainian Church cookbook in her pantry while cleaning out the house.  It contained so many of the traditional recipes that we love so dearly.


This bread is easy to make.  I say this because before I attempted it, my experience with yeast breads was zero.  I had no clue what I was doing, and turned out two beautiful loaves.  Over the past eight years, I've made notes, changes, and alterations to the recipe to better work the dough and make it more to our liking.  We have even used it at Christmas for the best bread pudding you have ever eaten.  Trust me, this bread is so yummy, you'll want it year-round, not just on Easter Sunday.  But for me, whenever I bake it, the smell wafting from my oven smells just like springtime.  And grandma's house.


Like I said, the recipe has been well-loved! (don't worry about translating this one, I'll give you a clean copy below)


Lay out your supplies BEFORE starting. There aren't many elements to this bread, so make sure you have the highest quality ones you can find. And use whole milk. It makes the bread so much better. 


You will start with the yeast going into your mixing bowl.  After making the bread once, I started using our stand mixer with the dough hook.  Much better this way, than using the old fashioned method of elbow grease and a wooden spoon.  I think I dislocated my arm in that process.  As you can see in the photos, I put the 2 packets of yeast into the bowl with the 1/4 cup of warm (110 degree) water, and after I'm done with the following steps, it has "bloomed" nicely and has little bubbles telling me it is ready to go!


While the yeast is "blooming" you will be scalding your milk in a sauce pan.  Basically, you have your milk over low to medium-low heat until small bubbles form.  Whatever happens, DO NOT LET IT BOIL! Get it to around 110 degrees.  This makes your yeast happy.  At the same time, or before scalding your milk (whichever is easiest for you) take your 4oz of butter, chop it up into smaller pieces, put it into a bowl with your 3/4 cup of sugar and 2 teaspoon of salt.  This saves mucho time later.  When the milk has properly scalded, you'll put it into the bowl with your butter/salt/sugar and mix until the butter is melted.  Set this aside to cool to lukewarm.  


Butter/Sugar/Salt
Add scalded milk and make some bubbles with whisk. Then cool your jets. 

Now I sift my heart out.  Sifted flour creates better, happier, softer baked goods.  At least that is what Ina Garten says, and she is brilliant.  Into a very large bowl, sift 8 cups of all-purpose flour.  I use every last morsel of it, and then some.  And I make a holy mess doing this.  


Pre Sifting

Post Sifting

Only a part of my mess. I can't get my sifting under control.


Now, break your three eggs into a separate bowl.  Your milk mixture should have cooled at this point, and will be egg-ready.  Beat the living daylights out of your eggs.  I should mention at this point that I prefer extra-large eggs.  Especially in a bread like this that features their flavor profile so prominently.  And make sure, for goodness sake, that they're at room temperature before using them.  


Add your milk/butter/sugar/salt mixture, and your eggs to your yeast in the mixing bowl.  Blend well.  See, pretty yellow color below.  


Now comes the fun, messy, sticky part.  Adding the flour.  Ready? Set. Go!


Here you see some of the flour added...about half is in at this point. 

Now most of the flour is in...look at that mixer go!


The dough is now "workable"
The recipe states to add enough flour to make a "soft dough."  This isn't specific enough for me.  I want to know exactly how much to add.  Sorry to disappoint you, because I can't honestly tell you the answer to this problem. Sometimes I don't quite use all 8 cups, and sometimes I use almost 10!  You don't want liquid, that is for sure.  I use the dough hook action as a guide.  If it is pulling the dough away from the sides, without it sticking, I know I've got it good to go.  This is a very sticky bread dough, but it should form together rather well, and NOT RUN.  At this point, let it rise in a warm spot, covered for a half-an-hour. (I have my oven running and set it near the convection fan)


Poof! The dough is risen!
Ready for some fun now? The raisins get to join in the party now.  The dough is risen once, and we knead in the raisins.  Each time I've made Paska my family tells me there are not enough raisins in the bread.  The recipe calls for 1/4 cup of them.  This makes two loaves of bread.  For you math geniuses out there, that comes to a measly 1/8 cup per loaf.  I've increased the "raisin count" to the entire bag.  Yep.  You read that correctly.  One full bag of white raisins.  That is how much I love my family.  I know I couldn't cram one single more raisin in there...you'll see why.


One full bag of white raisins (used for their softer, sweeter texture/flavor).  This is how much I love my family. 


Take your dough, spread it out on a floured surface.  Sprinkle liberally with raisins.  Fold over, knead.  Spread flat again.  Sprinkle more raisins.  Repeat until the entire bag is worked into the dough. 


I love my family so much that I cram into the dough, and entire bag of white raisins.  When you knead it, they jump out of the dough.  See em? I just poke those suckers right back in, so they will meet their fate in a 325 degree oven anyhow.  


Divide into two equally sized loaves.  You can bake in any type/size pan you like.  I prefer one fancy for Easter Sunday, and one more "rustic" for us to rip into while it is still hot.  Once in greased pans, allow to rise until double in size. (time varies...just keep an eye on them...and keep em warm!)


Doubled! Ready to bake...almost.


I brush those bad boys with an egg wash so they're purty when they are baked. 
Bake your loaves in a 325 degree oven for 40-45 minutes.  They should sound hollow when tapped/thumped.  Cool on wire racks.  Eat at least one as soon as you can touch them.  Mmmmmmmm. 


Don't you wish you had smell-o-vision.  Or monitor? Which is it?
See those raisins? Those mean love. Deep love for my family!
Hope you enjoy some Paska bread soon! It makes up two huge loaves, one for you to eat, and one for you to share (or not).  It is absolutely delicious and comforting.  I may have to make more this weekend just because I edited these photographs and they look so yummy!


Easter Paska Bread


2 cups whole milk
3/4 cups sugar
2 tsp. salt
4 oz unsalted butter
2 packets dry yeast dissolved in 1/4 cup warm (110 degree) water)
3 extra large eggs (well beaten)
7-8 cups flour
1/4 cup white raisins (only if you're stingy)


Scald milk.  Into large bowl add scalded milk, sugar, salt, and butter.  Add to yeast mixture, stir until well blended.  Add eggs, stir enough flour to make soft dough (until dough workable).  Cover and set aside for half an hour.  Turn onto a lightly floured surface.  Knead until smooth, adding flour as needed.  This is when you will add raisins to dough.


Grease two pans (in any shape you want).  Divide dough in half and place each half in pan.  


Let rise-double in size. Brush with egg wash. Bake in preheated oven at 325 degrees-40 to 45 minutes.  Cool on wire racks.


Blog Footer

Tuesday, April 19, 2011

Easter and Food

I love holidays, if you hadn't already figured that out by reading so far.  I love them for all the family fun we always manage to have.  I love them for all the goofy pictures that get taken.  I love them for the traditions that get played out each and every year, sometimes without us noticing we're making traditions until they're set into stone.  


Easter was always a big deal for us when we were kids.  Not like Christmas big deal.  It was different in its own fantastic way.  My grandma took me shopping weeks in advance to pick out a special extra-dressy dress to wear to church.  I would (of course) choose something with tons of lace and frill.  Usually requiring one of those slips that had crinoline on them (that look like a Tu-Tu).  We would get white gloves, fancy tights, "tappy" shoes in white patent leather, a matching purse, and...wait for it...a hat.  With a bow on it.  Man, I loved those hats.  Do little girls even wear hats for Easter any more?  On Palm Sunday, my grandpa would go to church at the Ukrainian Catholic Church so he could bring home pussy willow branches for us.  Those are distributed, rather than palms, because that is what was readily available in that area of the world.  One spring, we put ours in a vase of water until it sprouted roots.  That tree stands at the front corner of my parents' house to this day.  During Easter Week, we would procure perohi, paska bread, ham, kielbasa, and other delicious foods to devour on Sunday.  I have vivid memories of that feast.  The throwing off Lenten restrictions and literally eating until I can't hold another bite of food.  Some of those foods are my absolute favorite-the potato and cheese perohi, the paska bread, the smoked kielbasa.  When my grandma passed away, one of the thoughts that came to my mind was how to maintain some of our food traditions each spring.  As we cleaned out her house, I stumbled across a cookbook from one of the local Ukrainian Churches.  In it are a few recipes for perohi and paska bread.  So began an adventure...


I had no idea what I was in for.  My grandma was not a cook.  Beyond Velveeta Shells and Cheese or Mozzarella Sticks, she stuck to carry-out.  I once asked her to teach me to make perohi and she told me she'd forgotten how.  Our traditional Easter foods were bought from the Ukrainian Church ladies.  Homemade, yes...just not by us.  Well, that spring, eight years ago I spent hours, upon hours in our kitchen.  Rolling out sheets of potato pasta dough.  Forming scads of filling in my hands.  Boiling pots of water.  Frying up onions.  The next day I tried my hand at making bread.  No idea how to do it, but making the attempt.  The perohi and paska bread were a hit.  Now, eight years later, I have it down to a science.  I won't be spending an entire week in my kitchen.  I have a pasta machine to roll the dough.  I'll  make the fillings in advance.  I'll use my stand mixer to knead bread dough.  I'll slice onions ahead of time.  And on Easter Sunday I'll arrive at my parents with over 100 perohi in hand, two loaves of sweet and delicious paska bread.  No hat anymore, but plenty of food, family, and fun.  


So, what are your Easter traditions?  Any delicious food beyond the expected ham?  Let us know!


Blog Footer

Sunday, April 17, 2011

I Died and Went to Chocolate Heaven

I love chocolates.  All things chocolate.  When I went to Europe 9 summers ago, I ate my way through Brussels, Paris, Venice, and Florence on the back of chocolate shops.  I'm not a chocolate snob per-say.  I would drown my sorrows just as easily in Cadbury Eggs, Almond Joy Bars, Hershey Hugs, or Reese Cups as I would Deitsch's Brothers chocolate covered pretzels, fine Belgian chocolates, Godiva, or any other handmade delicacy I can get my grubby, chocolate-covered paws on.  One of the many ways my husband romanced me was to bring chocolates and red wine over to watch PBS one evening (I never claimed we weren't nerds...)  Well, last Sunday, I discovered a new place for chocolate lovers, such as myself.  


Lilly Handmade Chocolates is located in the Tremont neighborhood of Cleveland, Ohio.  We were having brunch just down the street, and when we were walking into the cafe I spied the bright pink sign for Lilly's down the street.  Of course, I would have to inspect it.  Immediately after brunch we took a stroll down the street.  According to Lilly's website they are, "an artisanal chocolatier that specializes in pairing fine wine & craft beer with its fresh, handmade chocolate confections."  Well, had I known that, I might have skipped brunch and headed straight for the chocolate shop.  (Okay, I wouldn't have, because Lucky's Cafe was amazing.  So good, I forgot to take any photographs, so much into a food coma was I.)  The shop is bright, shocking pink.  Delightfully pink.  Elle Woods would approve.  Each chocolate was matched with a bottle of wine or craft beer.  I think there may still be puddles of drool in front of their glass case.  (so sorry ladies!)  There were also these steel sculptures made by a local artist holding Lilly Chocolate's bark, and special Easter Eggs.  So began my decision making trial....


I decided to go with a six-piece assortment to sample a variety of flavors, along with a Salty Bunny Egg for our boy Jack (and us as well!).  Owner, Amanda Montague and a lovely assistant were both on hand to discuss the offerings that sunny Sunday afternoon, so when we left, I felt ready for my first (of many!) Lilly Chocolate experiences.  


My Six-Piece Assortment Box Sampler
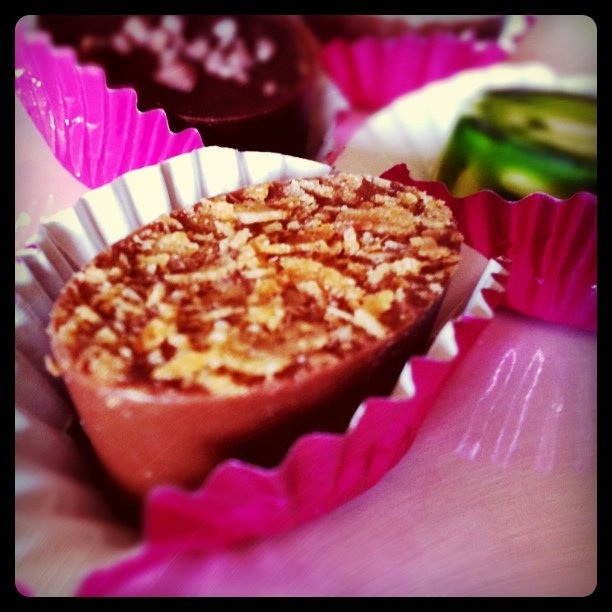
Three of the chocolates I chose were a bit of a walk on the wild side for me-while I love chocolate, I do not typically like when it mixes with something healthy, like fruit.  But I chose 40 Winks (dark with lavender essence), Cinnabunny (dark with Vietnamese cinnamon/ground ginger and honey), and Lime (white with lime juice) as my "daring" choices.  My safer choices were Old School (milk with malted milk), PB Monsters (milk with peanut butter/honey/crunch topping), and Southern Gentleman (milk with Makers Mark and buttered pecan).  Ready?


Forty Winks
 This was my very first taste of Lilly Chocolate.  I chose it because the flavor profile reminded me of my favorite Jeni's Ice Cream Flavor (Wildberry Lavender).  I was a bit skeptical, but totally wowed!  The bittersweet chocolate made the lavender flavor more pronounced in the ganache.  And that candied violet on top, was a subtle and sweet crunch.  
Cinnabunny
Now, I have fallen in love with Saigon Cinnamon ever since Jeni used it in her ice cream, so while this was a little "daring" for me, I was looking forward to tasting it.  I found the chocolate profile to be less bitter than the Forty Winks but perfect for the accompanying flavors.  The cinnamon taste reminded me of those red hot candies I loved as a child-only all grown up!  And those cocoa nibs on top, where can I get my hands on some to throw into my own candies and cakes? Delicious!
Lime
Now, I am a sucker for Key Lime pie.  I see it on a menu and am immediately figuring out how to save room.  I love lime beverages, lime candy, lime everything.  However, I have yet to try lime with white chocolate.  Why have I waited so long?  I could smell the tartness of the lime curd filling before even biting into this.  The mellow, buttery white chocolate was perfect for the puckery lime filling...I could almost picture myself on the deck at AJ's Dockside in Tybee Island.  Almost.
Southern Gentleman
This ended up in our box because I made a killer Dark Chocolate Bourbon Pecan Pie for the holidays.  It fairly oozes chocolate, and I only use Maker's Mark.  I even put the booze in my whipped cream.  Well, the Makers Mark hits you as soon as you sink your teeth into this beautiful plaid chocolate.  The milk chocolate tempers the booze flavor only enough that it doesn't bite back.  And that pecan inside was buttery perfection.  I would swear that Amanda was standing over my shoulder as I baked my pies when she came up with this one.
PB Monsters
We are a peanut butter loving family.  So it only served to reason that I added a peanut butter filled concoction to our sampler.  PB Monsters ruins forever any grocery-store checkout peanut butter candy for me.  It was salty, crunchy, and had just the right amount of peanut butter flavor so as to not overwhelm the smooth milk chocolate.  

Old School
I ended the tasting with Old School.  This was dusted with malted milk powder on top, which was a delicious touch.  It reminded me of those delicious malted milkshakes you can only get in the summer from our Midwestern custard stands.  It was smooth, malty, milk chocolatey goodness all in one bite.  Perfection!

Snif. Guess it is time to restock.

In all, I would have to say that my favorite was the Forty Winks...a surprise for me since I am more a traditionalist when it comes to chocolates.  It makes me anxious to return to Cleveland and get a sampling of all the other delectable chocolates Amanda cooks up!  Of course, I could order online and have them shipped to my doorstep, but it wouldn't be as fun as strolling the length of the counter, chatting with them, and browsing the immense wine and craft beer selection they have.  I promise, if you can check out Lilly Chocolates, you will not be disappointed!

Blog Footer